It’s no secret; weddings are expensive. For every item in your wedding, there is a price tag. Your dress. Your bridesmaids’ dresses. The venue. Tuxedos. Flowers. Place Settings. Food. Centerpieces… Before you know it, you’re clutching your chest and your purse. Since the tradition of the bride’s parents paying for the wedding, or at least all of the wedding, is becoming less frequent and less practical, some of the burden of cost gets shifted onto the happy couple themselves. With you and your partner preparing to start a life together, this can be pretty overwhelming.
While you don’t want to cut corners on your special day, there are some ways you can cut down on spending. Here we have a favorite do-it-yourself wedding updo, so you can look great on the big day without hiring a hairdresser. However, while this may be DIY, you’re going to have a really hard time doing it alone. Enlist the help of a close friend, sister, or mom for the trickier parts.

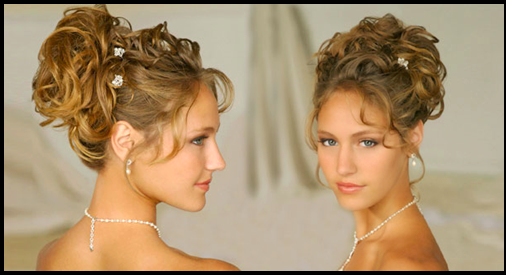
Simple but Elegant Wedding Hair: Just twirl, Spray, Pin, Repeat.
For women with naturally curly hair, even coercing your mane into a ponytail is significantly more difficult than it is for your straight-haired friends. For this hairstyle, however, naturally curly hair is a blessing. However, it works on all hair types. To prepare, mist your recently washed hair with a touch of your favorite flat iron spray and dry on low heat with a diffuser. This may take a while, so plan for the time, and like with all other important hairstyles, rehearse it.
Wedding Updo or Wedding Half-do?
This hairstyle looks great either as a sophisticated updo or a graceful half-do. It’s just a matter of deciding what looks best on you and how well your hair cooperates. Once you know, pick a spot either very near your crown or anywhere in the next two inches below it for the “nest.” Don’t set your nest too high, or by the end, you will have a mass of mess right on the top of your head, especially for those of us who have an abundance of hair, which is probably most curly-headed women.
Separate your bangs, if you have them, from the rest of your hair and section them off with a hair tie. Don’t use a clip, because it will interfere with the rest of the hair. Next, section off the back bottom half of your hair behind the ear, again with a hair tie. Finally, section off each side of the hair from your ear forward and up to your temple.

Start Styling
This hairstyle might look complicated and it might be time-consuming, but it’s actually very easy. Here are the steps.
- Start with the hair nearest your crown. Otherwise, you will end up in a trap with hair that can’t be accessed, and you’ll have to begin all over again. Select your first small chunk of hair (it doesn’t matter where). Twirl the hair around your finger all the way up to the root. Spritz twice with a low-hold hairspray. Be sure to use a spritzer and not an aerosol hairspray, because you don’t want to use too much product, and a spritzer gives you more control.
- Release the strand, then take it again by the root with your thumb and middle finger. Slide your fingers down the strand to the place where you will place the pin. Place the strand on the nesting area with your thumb on your scalp. Slide the thumb out gently, and press the hair into your scalp with your middle finger.
- Secure the strand into the area with a bobby pin. Don’t get too finicky, this will build into a large area with quite a lot of cover. Just make certain it is secure.
- Repeat this step until all the hair of your crown is securely pinned up, and you will start to see the beginning of the nest, which will make the rest of it easier and easier as you go along.
- Work your way back from the crown. If you’re going for a full updo, release the back section of hair and work all the way down to the hairline on your neck. If you’re going for a half-do, simply repeat the first 3 steps: Twirl, spritz, release. Using a spiral curling iron is a good idea for hair with less natural curl.
- After the back is finished, release the sides and begin working your way forward. The further you get from the nesting area, the further down the strand you will have to run your fingers; this will give the curl even more buoyancy. An easy way to make sure to avoid burying the hair you haven’t styled yet is after working your way forward a little bit, fan out around your head, and then go forward a little more. Once you are at this point, just keep going. No error you make now will be fatal. Keep working your way forward and out until there are only a few pieces left around your hairline. For these pieces, you can use a spiral curling iron for very tight curls or just twirl, spritz, and release.
- Add in a few decorative ivory, gold, or silver hair clips in front of the nest, and that’s it. You’re done! Grab a can of Aqua Net or your favorite max-hold aerosol hairspray, hold as far away from your head as possible. Take a deep breath, cover your mouth, close your eyes, and let her rip. You do not want this to come down until the day is over.
Here at FanC, we are here for your whole bridal experience. While we want to help you find the perfect dress, fit just for you, we also want to help you create the wedding of your dreams. Do you have an idea for a great do-it-yourself wedding updo? Or another idea on how to save money at your wedding without dimming the light on your magical experience? Tell us in a comment below!